Do you like the design of this blog? I freakin’ love it, but you could say I'm biased. And if it’s not obvious, I didn’t create it entirely by myself. I hired a web designer and it cost a lot less than you might expect.
If you have your own killer blog idea, consider creating a custom WordPress design like this for yourself. Read on and I’ll step you through how to design a blog just like this one.
A successful blog should look professional and convey the right theme. So unless you’re an experienced graphic artist, that means you probably shouldn’t do the graphics yourself. You need to find a freelance web designer and make sure they understand your vision. And the easiest way to convey your concept to a web designer is to create a wireframe.
What is a Wireframe?
A wireframe is a basic layout to help you explain the high level design of your blog. It’s essentially a blog blueprint without any finalized graphics. Using wireframes is a great way to convey simple concepts like navigation and content elements while leaving the door open to a variety of design options that your web designer can present to you.
You can create a wireframe in Visio, on a whiteboard, or even the back of a napkin, however, I’ve found the best results using a free wireframe tool like Balsamiq or one of these.
Most wireframe tools have easy drag and drop web layouts that look like sketches. They use a sketching style to reinforce the fact that designs are in the mock-up stage and specific artistic decisions should be made later.
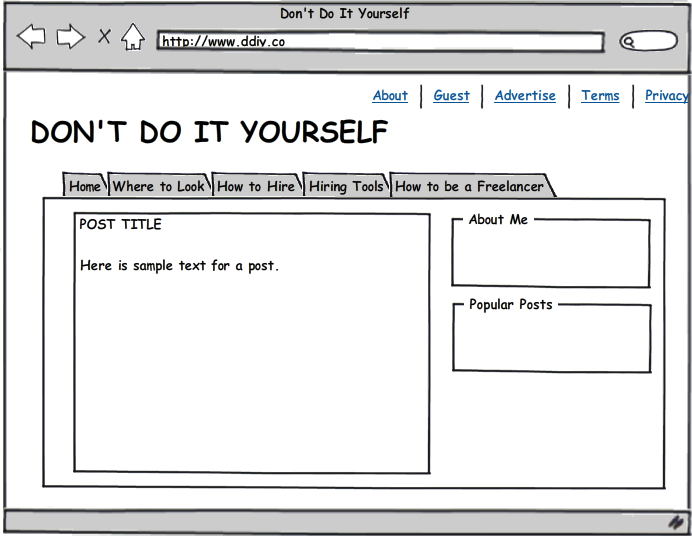
To give you an idea of how a wireframe evolves into a finished product, look at the wireframe I created for this blog below. Believe it or not, this wireframe only took about 10 minutes to create.

Design Elements You May Want to Include In a Blog Wireframe:
- Simple overall layout
- Navigational menu and content categories
- An About page, Terms and Conditions, Privacy Policy, and contact form
- Placement of blog title, header graphic, and headlines
- Post area
- Ad areas
- Social sharing icons
- Footer layout
- Alternative layout for full-width pages
Explain your Concept in a Design Brief
After you’re done wireframing, you should put together a brief written summary explaining your vision. This is called a design brief and only needs to be about one page or less.
Here’s what should be included in a design brief:
- Theme (summarize your content and niche)
- Who is your target audience?
- Desired colors and tone
- Include examples of similar websites that have design aspects you like
Here’s a summary of the design brief I used for this blog:
- Theme: Finding various types of freelancers, entrepreneurial topics, running a virtual office, and blogging tips
- Header Image: A relaxed entrepreneur getting assistance from a team of freelance workers.
- Target Audience: Bloggers, Entrepreneurs, and Small Business Owners
- Colors: I like deep blues, but I’m willing to see other options
- Examples: I didn’t have any other website examples (do as I say, not as I do!)
Establish a Web Design Budget
After sending your wireframe and design brief to a designer, ask them to provide you with an estimate. Most designers work on an hourly basis and should be able to predict how long the job will take. If they do not quote a fixed price, keep in mind, the estimate may not be exact. My rule of thumb is to budget 20% over a designer’s estimate (but I never tell them that).
Some web designers will simply give you a finished image file for your whole site and others will take the final step and code that image into a blog. Before a designer starts the work, make sure you set expectations about whether they will also do the coding or not. Sometimes a web designer is able to code a site themselves and sometimes you need to find a web developer to slice apart an image file and turn it into a WordPress blog. Make sure you understand the difference between a web designer and a web developer.
Expect Iterations
Don’t get stuck on your initial design. Wireframes help explain the high level concept and components required, but it’s generally best to allow a designer to make recommendations on the details.
I like to have a designer provide two or three sketches of different concepts that I can choose between. I’ll pick my favorite and provide feedback about what works and doesn't work within the design. I’ll usually go through 3 or 4 iterations with my designer before I’m happy with the final result.
Consider hiring a designer to help with your blog. Having a blog with a professional look can make a big difference in your success. And its easier and more affordable than you think!


