If you use affiliate marketing on your website, you better be tracking which of your clicks result in commissions. Tracking affiliate clicks allows you to identify your top performing links and focus on them to increase your earnings.
Most people fall into the trap of setting up one link per affiliate program. If you do that, conversion stats will be lumped together in your reports and you won’t be able to figure out which links perform better than others. Consider creating a separate link (or sub campaign) for each major area of your online properties. When you view reports, you’ll be able to see a detailed view of how much money is generated by each area.
For instance, you could setup a different link to the same affiliate program for:
- Your sidebar
- Your header
- Each post where a link is used
- A comparison table
- Your email list
- Your ebook
Let’s review how you can track affiliate conversions from a click to a commission. First you’ll need to setup links with proper tracking codes (often called an SID) through your affiliate network. Then you’ll want to incorporate each link on your own site using a redirect plugin.
How to Add Detailed Conversion Tracking through your Affiliate Network
To track where conversions originate, you’ll want to start by creating a custom link/code for each area of your site that you want to track. You can do this on most affiliate network websites or through your advertiser if they run their own affiliate program. This tracking code is called something different by each advertiser, but many call it a SID.
Sugarrae has an awesome tutorial on how to track and report on SID’s for 6 of the most popular affiliate networks (so bookmark her post!). Here she explains how you can configure links in Commission Junction.
Adding a SID to a CJ Link
Find the link you want to use and click Get HTML code or Get JavaScript. Choose the website you wish to use the link on from the Web Site dropdown and then in the SID box, put whatever SID code you wish to. (for example, I might use “SIDEBAR” to denote it was a link that would appear in that site’s sidebar). Click Update Link Code after you’ve entered the desired SID in the box and the “wizard” will add your SID to the link for you.
Now, you don’t need to use the wizard to add an SID to your CJ link, but I find for new affiliates, creating new links, you might as well. But let’s say you wish to update CJ affiliate links currently on your site that you’ve already generated.
Simply take your current CJ affiliate link and add ?sid=YOURSID at the end of it:
http://www.kqzyfj.com/click-1111111-11111111?sid=WHATEVERYOUWANT
Commission Junction will automatically begin tracking that SID once it’s been clicked on and start showing it in your reports.
Viewing your CJ SID stats
While CJ makes it easy to add an SID, a decent reporting interface showing the stats for them is another issue. The only way I can see to view them is via the “Commission Detail” screen or report. To run a Commission Detail Report you need to go to Run Reports > Transaction Reports > Report Options and run a Commission Detail Report under “Select Report Type” and the when the “Filter Results By” section updates, you can choose to change the “Order By” drop down bar to Order By: SID and click Generate Report.
If you want grand totals for each SID or other aggregate totals, you’ll need to download the report and do it via excel.
How to Build Links on your Site to Track Conversions
After you’ve created a link in your affiliate network, it’s time to incorporate it properly on your own site. You want to track which clicks result in commissions. And to do this you’ll want to use redirects.
Setting up redirects for your links is really quite simple and I discuss why they are so critical for every affiliate marketer in my free eBook:
How I Tripled My Affiliate Revenue Without Adding Traffic and You Can Too.
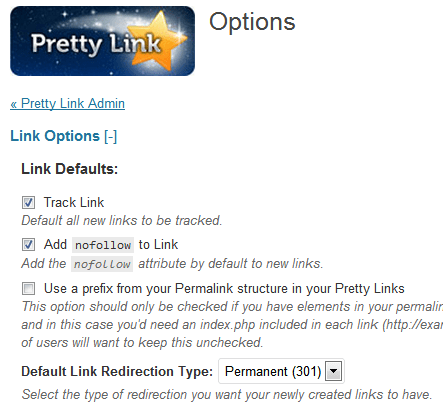
I use the Pretty link WordPress plugin for link redirection and click tracking is built in. The free version comes with basic reporting (good enough for most people), and the paid version comes with extra reporting through Google Analytics.
I only set 3 default options in the Prettylink Plugin:
- Track link
- Add nofollow to Link
- Default Link Redirection Type: Permanent (301)


Every time you want to create a new link, enter the original url you created in the section above (example: http://www.kqzyfj.com/click-1111111-11111111?sid=WHATEVERYOUWANT) in the “target url” field and decide on a new url in the “pretty link” field. The new url should be much friendlier and give you an idea of what you want to track. For example, if you wanted to track hosting conversions in your sidebar, the link might look like this: www.yoursite.com/hostingprovider-sidebar.


Save the link, and start using the new link in the appropriate place on your site.
PrettyLink Groups
PrettyLink also has a nice feature where you can assign links to groups in your admin panel. So if you wanted to easily access any of the links you used in your eBook, you could assign each link to the “eBook” group upon creation. Then just look in your eBook group whenever you want to retrieve anything from that subset of links.
Wrap-Up
Once you’ve setup a SID, dropped the new link into PrettyLink, and used the prettylink on your site, you’re all set. When you start getting conversions, you can go into your affiliate network website and see which specific links were the source of each commission. To increase your affiliate revenue, start pushing traffic to areas that perform well and remove or replace some of the links in low performing areas. It also helps to use an affiliate tracking plug-in, like Lasso [review].


